SHOCK ABSORBER REPLACEMENT/BILSTEIN SHOCKS
by Jim Anderson
At a technical seminar hosted by Geno’s Garage and presented by Bilstein sales manager Scott MacDonald, I became aware of certain signs indicating that after 60,000 miles in a 2006 two wheel drive Dodge Ram 3500 dually, the shock absorbers should be replaced.
Over the course of the seminar, Scott educated us about the construction and features of the different types of shock absorbers commonly found on the market. We learned that original equipment shocks typically do not last much longer than a new truck’s warranty period. Scott also taught us to recognize some of the warning signs that could suggest a shock needs to be changed, such as unusual tire wear, an active fluid leak, or a squishy sound as the vehicle goes over a bump, indicating internal seal leakage. Dodge Ram hock absorber performance deteriorates slowly and could easily go unnoticed by the driver until long past its expected period of functionality.
[ Get Bilstein shocks at Geno’s Garage. ]
A Bilstein (pronounced BILL-STYNE) monotube shock, unlike a conventional twin-tube damper, is designed to last the life of the truck! The single tube construction maximizes heat dissipation of the shock oil, while a high pressure gas charge prevents the oil from foaming as a truck navigates through various road conditions. Numerous examples of use in heavy truck fleets have shown Bilstein shocks to still meet new shock performance specs, even after several 100,000 miles on the road. Enough of the Bilstein commercial, but the results are impressive.
A shock absorber has two functions: to control compression and limit rebound. The compression function of a shock absorber is to dampen wheel motion after encountering a bump. The goal is to keep the tire in contact with the road surface. The rebound shock absorber function is to stop or dampen the repeated flexing of the truck’s spring after it has been set into motion by a bump. A metal spring is like a swimming pool diving board after a swimmer jumps off. It continues to flex through several oscillations. The action of the spring tries to remove the tire from the pavement several times if there is no shock absorber present. A shock may operate thousands of times per mile. A shock is not intended to “tighten up” worn suspension parts.
My truck was at the 60,000 mile mark and I felt (literally) that it was time to replace my shock absorbers. (Keep in mind, mine is a two wheel drive, 3500 truck.) I was determined to go the shadetree route, working alone, using only hand tools and a floor jack. No vehicle lift or air tools this time. And I was determined not to remove the front tires, but rather to work around them to eliminate the hazards of working near or under a jacked up vehicle. True shadetree work!
Tools used were a few metric wrenches, the aforementioned floor jack, a set of vise-grip pliers, and a piece of #10 solid copper wire left over from a home wiring job. The wrenches used were 8, 9, 13, 18, 19, and 21 mm, plus 13/16 inch. Sockets included 13/16 inch and 13 and 21mm.
The wrenches and equipment I used may not necessarily be the same ones needed for your truck model, but installation procedure and wrench sizes would be close to the same.
To start, park the truck on level pavement with the parking brake set and get out the needed tools and equipment.
Front Shocks
First, loosen the top shock absorber nut by using an 18mm box wrench. You can access that area by putting your arms over the top of the tire. Keep the very top of the shock stud from turning by using a 9mm wrench. In my case, the 9mm wrench slipped on the old shock stud’s two flat areas, so I resorted to getting a solid hold by using vise-grip pliers. Be careful that the plier jaws make contact on the stud end’s flat surfaces, but not on the stud threads. There is apparently a resident gorilla at each of Dodge’s truck assembly plants, as the top nut was not easy to break loose; but once it made a turn or two, it came right off. Perhaps leather gloves and/or a cheater bar on the wrench would make it easier for you to break the nut loose. The motto in this case is “whatever works” since these shocks will be trashed.

Break the top nut loose and back it off to the top thread. Then go under the truck and loosen the two nuts holding the bottom of the shock bracket to the suspension studs using a 13mm wrench. Remove all bottom nuts and then the top nut, washer, and rubber bushing. The old shock should drop out of place. Note the location and placement of bushings and metal cup washers on the old shock’s area under the top suspension arm.
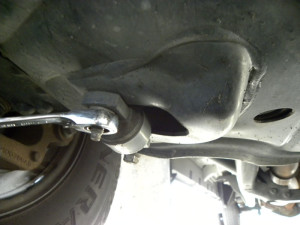
Jack up the front suspension near the shock absorber hole enough to maneuver the old shock absorber out from under the truck. I used a floor jack, but a long-stroke bottle jack should work as well. While using the jack, always place a jack stand or other support under the raised truck frame in case the jack slips or fails. By leaving the tire installed, if the jack slipped, the truck wouldn’t fall more than a couple of inches.
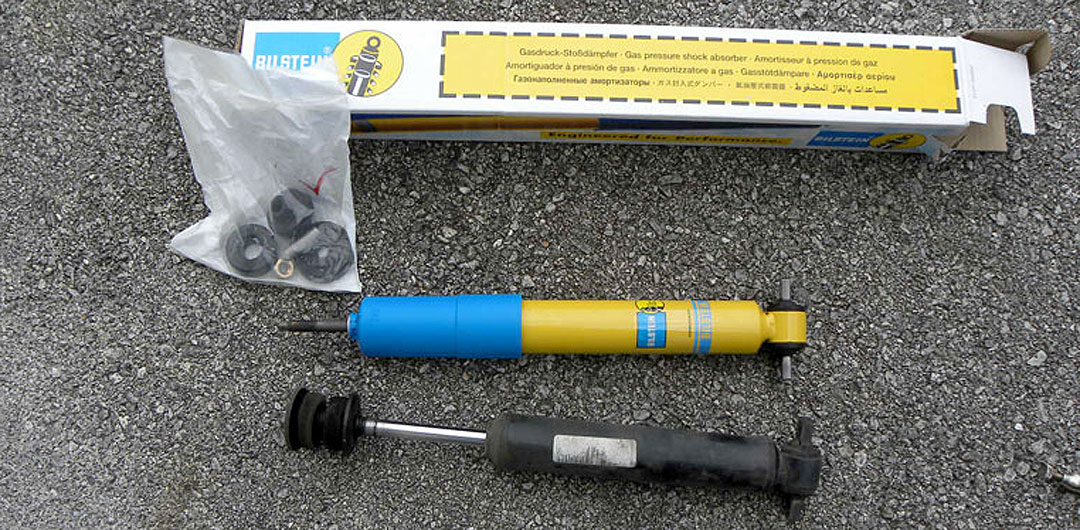
Observe how the bushings and metal cups are placed on the old shock and use the same arrangement on the new shock, using the new supplied parts that came with the shock absorber. A cup washer and then the flanged rubber bushing go on the new shock’s chromed rod before installation, and the plain rubber bushing and another cup washer go on top of the stud after it has passed through the top suspension hole. Make sure the flanged rubber bushing goes into the top suspension hole, centered with the shock upper stud. The new nut goes on last.

First, assemble the rubber bushing and metal cap piece that go on the new shock near the top before it is installed, as outlined above. Lay the pieces that go on the top of the shock’s chromed shaft after it is installed, on top of the tire. Use a bit of WD40 or similar spray lube on the rubber bushings to help everything slide together more easily.
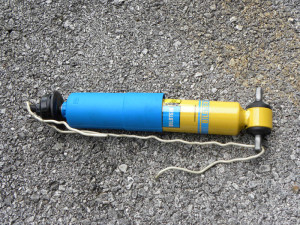
A hint: The new shock absorber is much stronger and has more gas pressure holding the shaft in the extended position, so I used a piece of solid wire wrapped around the threads on the top of the shock shaft and put the other end of the wire through one of the bottom stud holes. I pushed the shock closed by putting the top part on a block of wood on the ground, slowly pushed the shock body downward, then hooked the end of the wire around the bottom shock bracket to hold it fully closed or collapsed. The shortened shock can then be more easily maneuvered into place inside the suspension spring. When it was partially installed,
I removed the wire, and then lowered the truck jack.
Next, use the jack to carefully push the shock upward into place while guiding the top stud and previously installed rubber bushing into the hole in the top of the spring tower. Remember that this shadetree mechanic is working solo, so the jack acts as an extra pair of hands. Install the top bushing and metal cup, then thread on the new nut supplied in the package just enough to hold the top assembly in place. Using the jack, further raise, then maneuver the bottom shock bracket over the studs and install one nut. Be careful here, as both studs must line up with the shock bracket. If the bracket pushes too hard on the stud, it will be pressed out of its hole, and you get to re-install the stud using two fingers in a small area with no direct vision. It can be done, trust me. Remove the jack, install the other nut, and tighten everything up using a 13 mm wrench, working side-to-side as you fully tighten the nuts. The nuts are tight enough when you can’t move them further with a regular size hand-operated wrench.
Return to the top stud and use a 19mm wrench (yes, it’s bigger than the nut you removed from the old shock) to tighten the nut while holding the very top of the shaft with a 9mm wrench. Unlike the OEM shock, the Bilstein shock has a hex on the top of the shaft so your small wrench will get a good grip while you tighten the nut with the big wrench. Both wrenches I used for final tightening are box type. Because this bolt is a nyloc nut, it does not need to be tightened until it can be turned no more as was the OEM nut. Just get it tight with several threads showing on the shaft’s top.
Now repeat the process on the other side of the front of your truck. It will take you less time to do the other side, since you’ve now learned which tools to use, and what tricks help make the job easier
A tip: If your jack won’t raise your truck high enough (or you don’t have a jack) to remove the old shock and install the new one, you can dig a small hole in your yard, then park the truck with the shock over the hole. This will help you remove and replace a front shock absorber while using the hole for extra ground clearance without ever jacking up your truck. Don’t forget to fill in the hole before dark. (This is the true definition of shadetree.)
REAR SHOCKS
Replacing rear shock absorbers is much the same procedure as replacing the front ones, except you don’t have to hug the tires for top bolt access, and you don’t have ground clearance problems while removing them. Simply slide under your truck, lie on your back, and start twisting wrenches. If you like lots of access room, first lower and remove the spare tire from under your truck, especially to access the driver side upper bolt and nut.
The rear shock absorbers use a bolt-through-eye mounting method on both shock ends, different, but easier than the method of mounting front shocks. The rear shocks are placed far inboard, not good for truck handling in curves. Again, the Dodge “bolt gorilla” was on duty, so use a breaker bar or cheater bar to break the bolts loose with less effort.

Removal of the old shocks points out another Dodge “quirk.” To remove the top shock absorber bolt and nut, use 13/16 inch wrenches. To remove the bottom shock bolt and nut, use 21mm wrenches. You will need two wrenches for each fastener. Use an open-end or box wrench to hold the bolt head. A socket wrench or socket breaker bar with the correct size socket can then be used in both positions to turn the nut while holding the bolt head stationary. Re-use the old bolts and nuts to install the new shocks.
After the nut is removed, knock the bolt back far enough to clear the shock absorber eye, but with the end still hanging in the bracket, using a punch or another junked bolt and a few well-placed hammer taps. Remove the lower bolt first to make driving the upper bolt out easier. When installing the new shock, first install the upper bolt, install the nut, then tighten it loosely. Next, install the bottom bolt and nut, using a jack to carefully move the lower shock mount into place against its internal gas pressure if needed. Bilstein has thoughtfully placed a plastic shipping band around the ends of the shocks to hold them partially collapsed during installation. After installing the shock using both bolts, simply clip the plastic band and remove it. Pass the lower bolt through the shock absorber hole, lower the jack and get it out of the way, install the nut, and tighten both nuts fully.
Pushing the bolts through the new shock absorber grommets may require the use of a hammer and punch. Don’t damage the bolt’s threads. Use a bit of WD40 or similar lube in the grommet holes to ease bolt installation. Unlike the front, the rear shocks don’t use any separate bushings or cup washers.
Follow up by fully tightening the upper nut, and you’re ready to do the other side, which is the same, although the shock’s placement relative to the rear axle is different. This is an attempt by Dodge to control rear axle windup during acceleration and braking. Their method has little effect on axle movement.
You will note that I have not included any torque values for the fasteners, though a few are quoted in the various iterations of the Dodge service manuals. My suggestion is to tighten bolts and nuts “tight enough,” with larger bolts or nuts having more torque placed on them than smaller ones by the use of larger wrenches. Just ensure that they are tight, especially after the re-tightening process mentioned below.
After you complete the installation of new Bilstein front and/or rear shock absorbers, you’ll want to go for a ride. You’ll quickly notice the ride is a bit stiffer due to tighter internal valving of the Bilstein shocks and because the old ones were getting a little worn. After a few days and some elapsed miles, re-tighten all nuts again to make sure nothing has worked loose after the new shock bushings have seated well. Also make a note in your truck maintenance log book of this installation.
[ Get Bilstein shocks at Geno’s Garage. ]
Jim Anderson
TDR Writer
Originally published in TDR Issue 73.
August 2011
You can subscribe to the Turbo Diesel Register and receive a quarterly magazine with articles like this and many others delivered to your front door.
